
How To Make Trestle Legs

Pin By Fati On Bases Para Comedores Tz Diy Furniture Furniture Details Wood Furniture

Zelf Eenvoudig Inklapbare Pootjes Maken Tbv Tafel Zie Http Nzgardener Co Nz Diy Trestle Table Wood Diy Wood Projects Wood Projects For Beginners

Easy Trestle Legs Stands Or Sawhorse Cost To Build 40 Easy Woodworking Projects Sawhorse Concrete Floors

Minimalist Trestle Table Legs That Assemble Without Hardware Easy To Put Together And Take Trestle Table Legs Minimalist Furniture Minimalist Furniture Design

Farmhouse Table Wood Table Legs Farmhouse Table Diy Table Legs

Diy Sawhorse Table Legs Unfinished Diy Table Legs Furniture Diy Diy Furniture

A countersink drill bit makes this really easy.
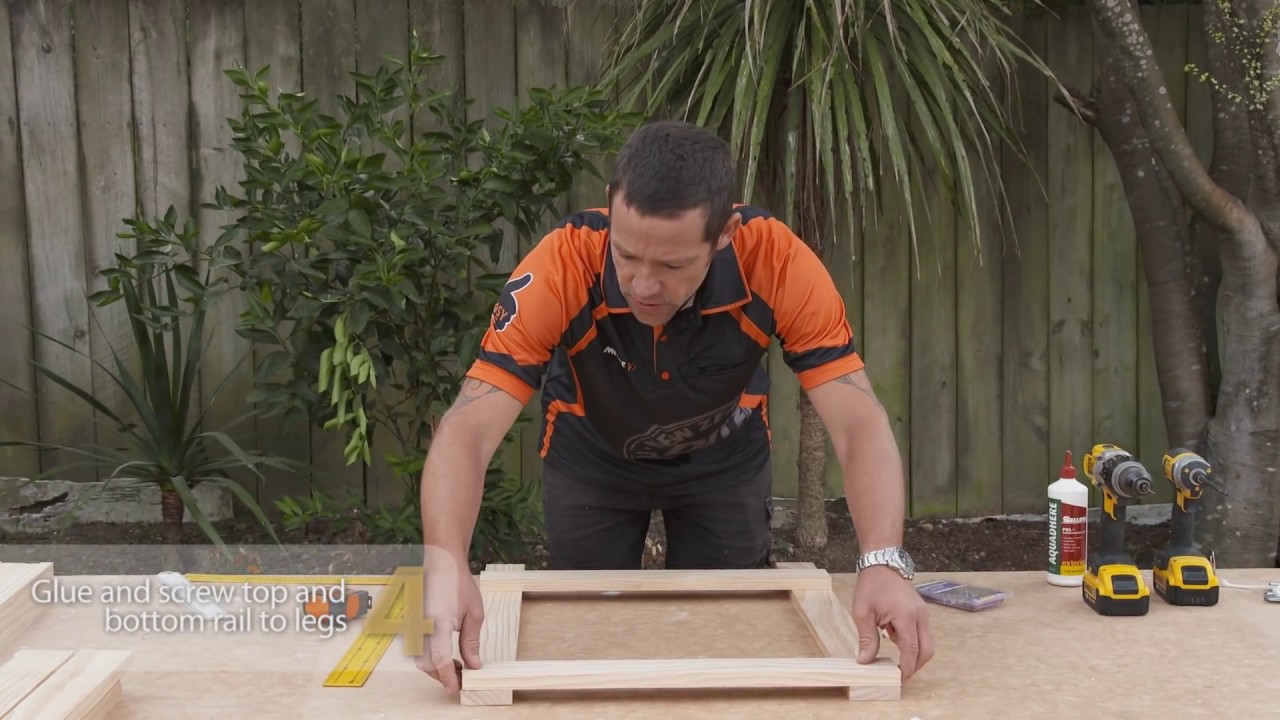
How to make trestle legs. Screw in the 35mm screws in the pre-drilled ends and using your square ensure the cross member is perpendicular to the legs. Trestle stands are designed to hold the slate frame so that the embroiderer has both hands free. Pass the rope through the holes melting the end with a lighter helps stop it fraying tie a knot at both ends and trim and melt the rope.
This will stop the legs from opening to wide. J Now that you have made the legs lay them down. The embroidery state frames with trestle stands are designed so that the top rail is adjustable.
As you make the cuts be sure to rough fit them as you go to ensure the best fit. One hand is above the embroidery and one hand is below. Now lay another cross member down and fix at the top of the legs.
After you have confirmed a good fit go ahead and apply Carpenters Wood Glue to the bottom and insides of the table leg and then use 1 14 finish nails to secure. Apply PVA to the ends of the cross member and lay on top of two of the legs on the pencil marks. How to Build Trestle Legs Mitre 10 Easy As DIY.
Build the A-frame using 2½ countersunk screws. The legs on the pencil marks. Once you have the blocks in place dry fit them to ensure you have a good fit.
This allows the slate frame to be at a comfortable height while stitching. Start by making the cuts per the plans. Free plans by Jen Woodhouse and step-by-step tutorial by Anikas DIY Life.

Diy Trestle Dining Table How To Build Anika S Diy Life Trestle Dining Tables Diy Dining Table Dining Table

Trestle Table Plans Home Adore Trestle Table Plans Diy Woodworking Farmhouse Table

Chiswick Oak Dining Table Handmade Kitchen Dining Room Tables Wood Table Legs Wood Table Design Diy Table Legs

Delightfully Noted Farmhouse Dining Room Table Diy Dining Table Diy Farmhouse Table
All My Trestle Legs Break Down Like This Medieval Furniture Renaissance Furniture Woodworking Furniture

Farmhouse Trestle Table Legs X Frame Table Legs Wood Table Legs Wide Table Legs In 2021 Wood Table Legs Diy Table Legs Farmhouse Table Legs

Diy Outdoor Table Free Plans Cherished Bliss Diy Outdoor Table Rustic Dining Room Table Diy Outdoor Furniture

Home Collection Furniture Diy Diy Furniture Wood Furniture
A Set Of Folding Trestle Legs Are Cheap Easy To Build Youself And Extremely Handy To Have Around You Can Use Them To Ma Trestle Legs Trestles Ikea Table Legs

Minimalist Trestle Table Legs That Assemble Without Hardware Easy To Put Together And Take Apart Cle Minimalist Furniture Furniture Design Trestle Table Legs

Note The 4x4 Legs Are Plenty Strong To Support This 4x6 Table Without The Typical Bracing On The Low Diy Farmhouse Table Diy Garden Furniture Diy Wood Projects

Traditional Table Legs Trestle Legs Unfinished Table Legs Etsy In 2021 Diy Table Legs Farm Table Legs Diy Farm Table

Pin On Home Decor
